
XMEye
How does XMEye Work?
Best Features of XMEye
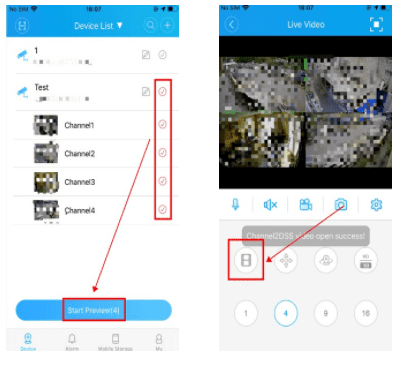
| Live Video | From your "Device List", you can select any device and click "Start Video" at the bottom to get into the live video interface. |
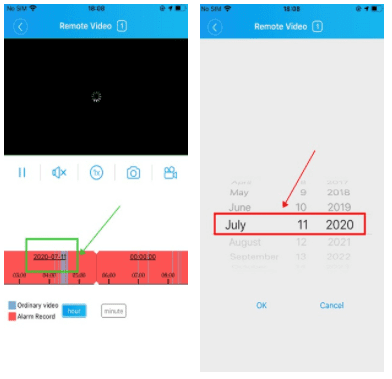
| Remote Playback | Using XMEye on a mobile device allows you to visit the device remotely; you can collect video from hardware storage and achieve playback. You can click a time on the top right corner to search. You can play / pause, record audio, or take snapshots as you wish. Of course, you have to make sure the video is available or it will not work. |
| Audio Speaking | Click the microphone icon to access audio speaking or mute it. You can communicate with your device from your mobile phone. Cloud technology makes connecting you recorder to the internet easy. The Teravision recorder uses a pre-loaded serial number to monitor via wide area network (internet). |
iCloud Setup Process
iCloud Setup Process
Install ActiveX Software:
- Turn on DVR. Ensure the DVR is connected to the Internet.
- Find the XMEye website on the computer for the software download: http://xmeye.net
- Click 'Install ActiveX' on the top right corner on the website. ActiveX software shall be downloaded onto your computer.
- Install the ActiveX software.
- Enter your user information (or leave blank) and click 'next'.
- You shall be directed to Installation folder. Choose a desired storage directory for video recordings and click 'next'.
- To complete the installation, click 'Finish'.
- Visit the XMEye website again: http://xmeye.net
- Click 'Register' on the bottom of the website to register your details and DVR.
- You shall be directed to Registration. Fill in the boxes as required and click 'ok'.
- On the main website, check that the 'By User' tab is selected. Log in with your username and password. Verify log-in by filling in the box with the four-digit numbers, displayed on the right hand side.
- Once logged in, click 'Add' to register the DVR device.
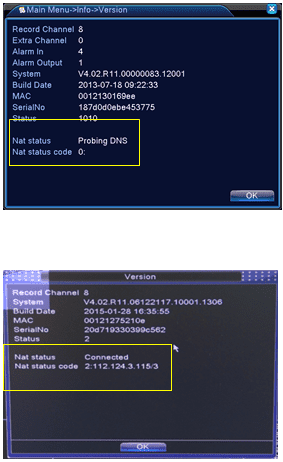
- Device Manager window will open. Fill in the boxes as required and click 'ok'. To find the serial number of your DVR, go to the main menu of your DVR. Select 'Info' and then 'Version'. Serial number (SerialNo) will be shown. Click 'ok' to close the window. The username and password must match the DVR setting.
- On the website, click 'My Device' in the left hand corner. The registered DVR should appear; click on the device to display real-time recording from your DVR.
- Visit the XMEye website again: http://xmeye.net and check that the 'By Device' tab is selected.
- Log in with the serial number of your DVR in the 'id' box. To find the serial number of your DVR, go to the main menu of your DVR. Select 'Info' and then 'Version'. Serial number (SerialNo) will be shown.
- On the log-in page, verify log-in by filling in the box with the four-digit numbers, displayed on the right hand side. Then select 'log-in'.
- Bit Rate Type window will appear. Ensure the boxes for 'connect all video (Main Stream)' and 'Auto Prompt' are checked. Click 'ok'. The username and password must match the DVR setting.
- The registered DVR should appear on the right hand side; click on the device to display real-time recording from your DVR.
XMEye Mobile App Setup
1. System Login
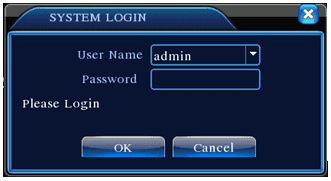
Ensure your DVR or NVR is powered ON and connected to your local network.
The system login credentials are (default)
Username: admin
Password: (leave blank)
2. Right click for Menu
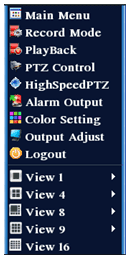
In live video mode you can right click mouse to get a desktop shortcut menu (Fig. 1). The menu includes: main menu, record mode, playback, PTZ control, High Speed PTZ, Alarm Output, color setting, output adjust, Logout, view 1/4/8/9/16 screens.
3. Enter Main Menu
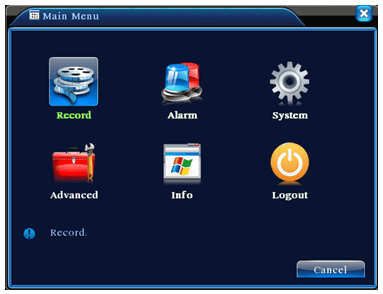
Once the "Main menu" option is selected you will be brought to this menu above, please left click on "System" for next step.
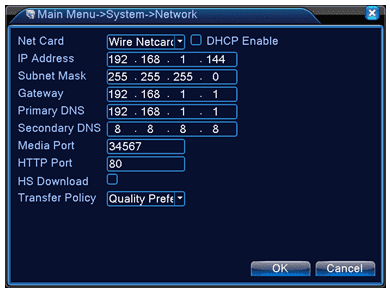
4. Network Setup
5. Connect to the cloud server
6. Install Mobile App
6. Install Mobile App
- Download app manually for android from xmeye.net
- Download "XMEye" from the App Store or Google Play Store
7. Login Interface
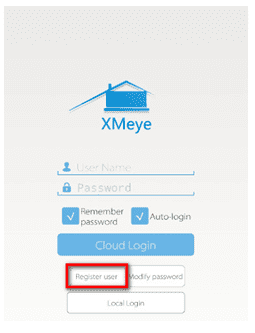
- Cloud Login (remembers your settings if you change the device or login from any other device using the same username and password). In order to use the cloud login, you must register a username and password.
- Local Login (all settings are locally stored on device and are lost if the app is upgraded or re-installed).
8. Device Search
8. Device Search
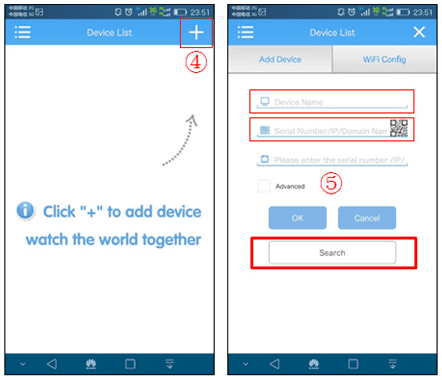
- Once logged (using your cloud username and password), go to device list on the mobile app.
- Click on the '+' symbol on the right hand corner.
- You will be presented with an Add device screen.
- Click on the Search button.
9. Device Setup
9. Device Setup
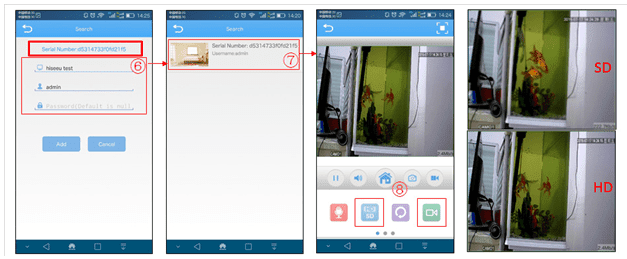
- Device Name: AHD DVR
- Username: admin
- Password: leave blank
10. Device Menu Functions
10. Device Menu Functions
| Button | Function |
 | Back to main menu |
 | Full Screen |
 | Change Port / Channel / View |
 | Pause / Play |
 | Audio |
 | Device Configuration |
 | Snapshot |
| Button | Function |
 | Recording |
 | SD / HD |
 | Remote Playback |
 | Intercom |
 | Refresh |
 | PTZ |
11. Remote Playback
11. Remote Playback
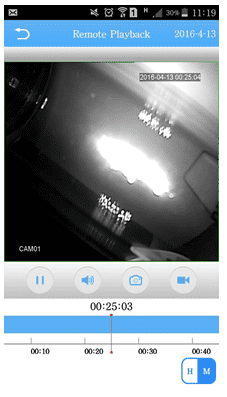
Playback Videos
In the DRV Software:
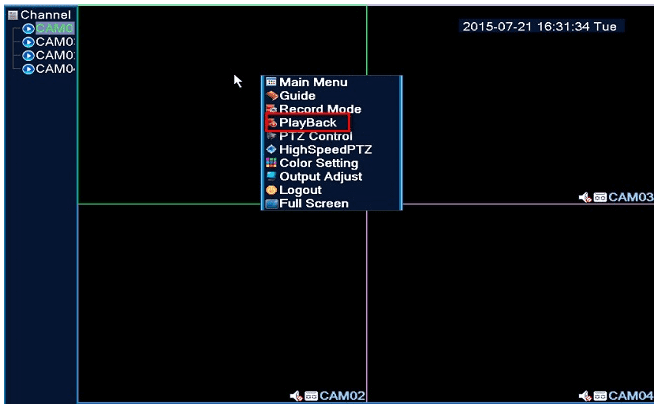
1. Right click on the screen in front of the required camera, and select PlayBack from the menu items.
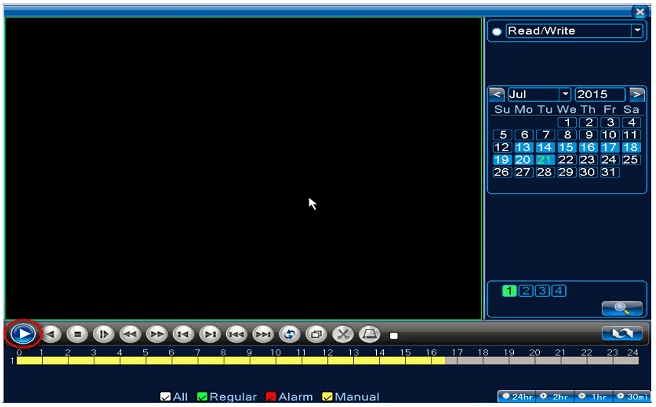
2. Then select the required time slot and click on the play icon in the lower left hand corner of screen.
On a mobile device:
The following pictures show how to playback videos on the Mobile App.
FAQ / Troubleshooting:
- If using the cloud, check to see if the DVR serial number typed in is correct. Check to see if the mobile device is connected to the data. Try using Wi-Fi.
- On the DVR itself go to System -> Netservice and check the cloud status. It should say "Connected". If not, check the network cable.
- Make sure the DVR can be accessed locally via computer. If you can only access the DVR locally, the cloud may be busy and you can try again.
- Close the mobile app and open it again. Test with another mobile device.
- Check the address bar to verify you are using the correct IP address and port number.
- Check every single digit because typos can be common. The address should start with "http://", followed by the external IP address, followed by the colon symbol and the port (":7000").
- Try another web browser to see if you can get a login.
- Make sure that any software firewall or hardware firewall is not blocking ports 7000 - 7001.
- Check for any port restrictions imposed by the router on both the DVR side and the remote computer side.
- Check all relevant settings including port filtering and application exception lists.
- Double check that the port and local IP addresses of the DVR are assigned for forwarding on the router.
- If you were previously able to access the DVR from the outside, make sure that the external IP address specified in the address bar is still valid.
- If using Dynamic DNS, make sure your account has not expired or test with the DVR's current external IP address instead of the host name.
- Double check the settings on the DVR. Make sure the DVR can be accessed locally. If you can access DVR locally but not remotely, there is a problem with port forwarding.
- Review your router port forwarding settings. Review the router manual. If the router is attached to another router upstream, you will need to do port forwarding from the upstream router to the current router. If you have changed routers, make sure the local static IP on the DVR is still valid for the router is it connected to.
- Make sure the computer is on the same router as the DVR. You can use the "ping" command from the command line to see if the DVR is accessible at all. Ping the local IP address that was assigned to the DVR. You should see response times from the DVR. If you get response times, you can log in locally using a web browser.
- If you get a timeout, reconnect the DVR's network cable on both ends, or test with another cable. Most network cables will snap in. You may also power cycle the DVR.
- Check network lights on the router and on the DVR network port. Try connecting to another physical port on the router. Make sure the DVR is using a unique local IP address.
- Check the validity of the IP address assigned on the DVR. Some routers have a numeric restriction on the range of local addresses.
- Make sure you log in with the correct local IP address and port. Check every single digit because typos can be common. Go in the DVR menu and verify the assigned address numbers.
- Recheck your assigned web port and media port. Check firewall settings. Try adding the DVR local IP to the local zone (Internet Options -> Security -> Local Intranet -> Sites -> Advanced -> Add -> Close -> Apply -> OK).
- Use another web browser. Access the DVR from another computer on the same router. Test the DVR with another router. If you have changed routers, make sure the local static IP on the DVR is still valid for the router it is connected to. Reboot the DVR.
- Check Internet Explorer's security settings for ActiveX (set "Prompt" for "Download unsigned ActiveX controls"). Click refresh to restart the browser. Make sure you port forwarded the media port. Double check for typos.
- Test IE access on the local network. Add the DVR to the local zone under Internet Options -> Security -> Local Intranet -> Sites -> Advanced. If the browser seems to take a long time or freeze, please allow a few minutes for the control to load.
- If using a laptop that was not used for setup, first set it up on the local network using the steps provided in the tutorial.
- If IE still doesn't work, you may use the CMS software that is on the website.
- Install the CMS software.
- Start up the software, and login with the default login("Super" and blank). You may check auto-login.
- In the CMS, go to "System -> Device Manager". If you see pre-existing devices and zones that you don't recognize, you may remove them.
- Go to "Add Area" and add a zone.
- Highlight the zone, then click "Add Device"
- Click "IP Search"
- Highlight the device corresponding to the DVR.
- Enter the username and password. Click "OK" and "OK".
- Highlight a quadrant.
- On the left, double-click on the new zone, wait for connection, and then double-click an active channel to display.
- Make sure the external IP address of the DVR has not changed (if not using the cloud). Test local internet access locally.
- If local IP access works, test at a remote location.
- You may need to restart the mobile device. Test with Wi-Fi instead of data. Test with another mobile device.
- Make sure you have the correct password and login for each IP camera. See if you can log directly into the IP camera. Restart the DVR.
- Make sure you are using a power adapter with the correct voltage and adequate amperage rating for the camera. Test with another power adapter if possible.
- Make sure you are using quality cables between the DVR and the camera.
- Make sure the hub or switch for the DVR is connected to handle the bandwidth of multiple network cameras. A gigabit switch or router will have higher bandwidth and is better suited for multi-channel HD video streaming. Test with another camera.
- IP cameras should have unique local IP addresses. Check to see if every camera has a unique local IP.
- Make sure that the recording schedule includes "Detect" and is set to "Schedule". If you don't want full time recording a camera, then uncheck "Regular" in the schedule for that camera.
- Make sure that a record channel is selected in Alarm -> Motion Detect, and that the channel is enabled. If using an IP camera, motion detection should also be set up in the camera itself.
- Try searching for and setting the camera as a NETIP camera instead of an ONVIF camera, and test again.
- Make sure you are able to log directly into the camera using a computer on the same router as the DVR. Try power cycling the camera.
- Make sure the networking cable is snapped in. Each IP camera should have its own local IP address.
- Verify that all devices connected to the router have unique local IP addresses. You may want to assign a unique static local IP for the camera.